Pumpkin, Butterscotch, & Greek Yogurt Breakfast Trifle

DSC01499

This is a great festive breakfast that also makes for nice presentation for a family gathering or potluck. Once per week I cook breakfast for the local Kiwanis Club, and I recently made this to kick off the start of the holiday season. Packed with protein and fiber, with a little sweetness to boot. 

  • 32 oz. container plain greek yogurt
  • 32 oz. container plain yogurt
  • 14 oz. can pumpkin
  • 1 box instant butterscotch pudding
  • 1 cup milk
  • 1 bag Special K honey granola
  • 1/2 tsp. Cinnamon
  • 1/4 tsp. Nutmeg
  • 1/4 tsp. Ginger
  • 2 T. pure maple syrup

1. Stir together in a bowl the greek and plain yogurts until smooth.

2. Add cold milk to pudding and whisk in a separate small bowl.

3. In another small bowl, combine pumpkin and spices.

4. Using a large glass bowl, begin the trifle with a layer of yogurt.

5. Add a thin layer of pumpkin.

6. Add a layer of butterscotch pudding.

7. Sprinkle with granola.

8. Repeat steps 4-7.

9. Finish the trifle with a final layer of yogurt sprinkled with the remaining granola.

10. Drizzle with 2 T. maple syrup.

11. Cover and refrigerate.

DSC01503

Elk Sausage & Spinach Quiche with Savory Crust

DSC01019

What can I say, it’s hard to stop eating this quiche! The crust is buttery, savory and melts into the mildly spicy breakfast sausage, spinach, onion, and cheedar cheese. Simple, filling, and good for any meal of the day.

Elk Sausage & Spinach Quiche with Savory Crust 

Servings: 4 large slices

  • Savory Pie Crust: recipe follows

-1.5  c Butter or Crisco shortening

-3 c. AP Flour

-1 egg

-1 T. White  Vinegar

-1 tsp. salt

-5 T.cold water

Using a pastry knife, work flour and butter/crisco together until mixture forms into coarse crumbs, then add egg, vinegar, salt, water and combine. I prefer using Crisco, but real unsalted butter works fine too. Form crust into ball and place in freezer for 10 minutes in a ziplock bag if you are using it immediately, this makes the dough much easier to work with. This recipe yields a top and bottom crust; I use one right away and freeze the other for later use for quiche or fruit pies.

  • 1/2 lb elk or venison breakfast sausage
  • 1/3 c frozen spinach, or more if it’s fresh
  • 1/4 c diced yellow onion
  • 1/3 c shredded cheddar cheese
  • 3 eggs
  • 1/2 c Half and Half ( I use fat-free)
  • Salt and Pepper
  • 1 T olive oil

1. Make pie crust as directed above. Divide dough in half, use one half now & freeze one half in a ziplock bag for later use.

2. Layer pie crust in a pie tin WITHOUT greasing the pan first.

3. Pour olive oil into medium frying pan. Add in diced onion and spinach. I threw my spinach in frozen because I didn’t have much left. Sautee on medium heat for 2 minutes

4. Add in breakfast sausage and cook until it crumbles and is no longer pink.

5. In a small bowl, beat three eggs with 1/2 c. half and half. Sprinkle with salt and pepper.

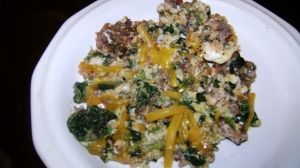
6. Pour meat mixture into pie crust and spread evenly on bottom.

7. Pour egg mixture over top.

8. Sprinkle with cheddar cheese.

9. Cover with aluminum foil and bake at 350 for approximately 35 minutes. If eggs are still runny, uncover and bake another 10-15 minutes until eggs poof up and are firm when you cut into the quiche.

DSC01018

Nutrition Information: 1/4 slice = Note: For dinner if I am really hungry I will eat an entire 1/4 of the quiche, but it is a lot. For breakfast or lunch, I often cut smaller slices, like 1/6 or 1/8 size. Information below is for 1/4 slice. The nice thing though, is that I never feel overly stuffed like after eating a large portion of some foods. This is a wholesome recipe with a good dose of protein that will keep you full and energized.

Nutrition Facts

Serving Size: 1/4 slice

Amount per Serving

Calories 674

Calories from Fat 395.5

% Daily Value *

Total Fat 43.94g

67%

Saturated Fat 26.06g

130%

Cholesterol 302.86mg

100%

Sodium 895.96mg

37%

Total Carbohydrate 37.16g

12%

Dietary Fiber 1.86g

7%

Sugars 3.32g

Protein 28.56g

57%

Est. Percent of Calories from:

Fat

59%

Carbs

22%

Protein

16%

* Percent Daily Values are based on a 2,000 calorie diet. Your daily values may be higher or lower depending on your calories needs.

Read more: http://www.livestrong.com/recipes/elk-sausage-spinach-quiche/#ixzz2HLWwgijd

1-egg Sausage and Spinach Scramble

Yesterday I enjoyed a beautiful Sunday afternoon with my first x-country ski of the season, a 5-mile trip to my old stomping grounds on the mountain. While I had debated going at all, due to the 11 degree weather, there was zero wind and sunny skies so I layered up, put on my balaclava and went for it. The hour and forty-five minute ski in the crisp air left me quite hungry for dinner last night, and also for breakfast this morning. For breakfast, I decided to make a quick, light scramble using our elk breakfast summer sausage.

DSC00973-1

1-egg Sausage and Spinach Scramble

  • 1 egg (local if possible!)
  • 1 T. medium salsa
  • 1 T. +/- raw breakfast sausage
  • 1 T. shredded cheddar
  • 2 T. spinach (I used frozen, fresh would be fine, too)
  • sprinkle of black pepper
  1. Spray a frying pan with cooking spray and cook breakfast sausage until no longer pink.
  2. Re-spray the pan with cooking spray, crack egg into pan and scramble with fork.
  3. Add in spinach (still frozen is fine) and salsa.
  4. Cook on medium heat until eggs set up and top with a large pinch of shredded cheddar.
  5. Sprinkle with black pepper. Breakfast is served!

Making Your Own: Venison Breakfast Sausage

What can I say, nothing beats homemade breakfast sausage that tastes as good or better than the storebought variety. While I know it is not always possible to do for a variety of reasons ranging from cost to time to lack of space, I also really appreciate being able to be a part of the entire hunting process, from the harvest to the processing to putting the meal on the table. Yesterday Joe and I made 18 lbs. of venison breakfast sausage with his late whitetail buck. He is a very nice older deer who will eventually have a place on our wall, and as such, we decided not to just cut steaks or make burger (which we have enough of from my elk to get us through the year), but to make sausage.

Using this kit, the Mountain Man Original Breakfast Sausage kit from Hi Mountain Seasonings, we used 12 lbs of venison that we had already previously grinded, and added in 6 lbs of grinded pork. For the best flavor at a cost-effective rate, we typically buy pork butt roasts (“Boston butts”) to add in with the venison when making summer sausage and breakfast sausage.  We bought 4 pork butt roasts from Smith’s during our trip to the big city last weekend using my Smith’s card, and after trimming them of excess skin, ground them up for a total of 22 pounds of pork for right around $50.

We added in both of the included pouches of seasonings into the vension/pork meat mixture and combined them together in the electric mixer for about 5 minutes. Last year when we followed the instructions pound-for-pound using a different flavor, we found our sausage to be very bland, and this year it is perfect, so I would recommend adding in a little more seasoning than is called for to get the best results.

Let the photo above be a reminder of how important it is to label what you process because even though you think you will remember the difference between the white bags and white with black bags six months from now, there is a good chance you won’t. Same with steaks and such– I opened an unlabelled vacuum-sealed package a few months back to find that it wasn’t leftover ground bratwurst as I had planned, but unknown-species steaks!

Typcially the game processing for us goes something like this: let meat hang in shop, butcher, wrap steaks using vacuum sealer, process immediately or freeze remaining meat to grind and then process later (1 week- 1 month later) into one of the following: burger, breakfast sausage, summer sausage, snack stick, trail bologna, and this year even pepperoni,which I cannot wait to try! Homemade pizza recipes to come!

If you have the resources available or can team with someone else who does, I highly recommend making some of this breakfast sausage. Also, slowly adding to your meat processing equipment year by year is a good way to gradually build up, without breaking the bank. A vacuum-sealer one year, grinder the next, etc. will go a long way toward enabling you to process your meat yourself. We are fortunate to be able to team with both sets of parents in sharing equipment, so that everyone benefits in the end. If your family lives close, meat processing equipment makes great gifts, just a thought for those holiday shoppers out there!

Venison Potato Brat Omelet

I have eaten my fair share of deer brats over the past 10 months and still have about 15 packages to go. While I am so thankful for the deer, harvested last fall with my late season deer tag, and for the meat it provided us, I am a little tired of eating brats in the traditional form on a bun (or in a rolled up piece of bread if you too cheap to buy buns, wink wink). To use up the rest of the stockpile, I have gotten creative. This is the second time I have made Venison Potato Brat Omelets. I really like eating brats this way, and it is a filling, quick, and inexpensive meal that would be great for breakfast, too. This is a basic recipe, so of course feel free to add additional vegetables, different cheeses, etc. to suit your taste.

Venison brats, thanks to this guy:

For this recipe you could substitue non-game brats just as easily. To make the venison brats, we used a kit from Hi Mountain Seasonings and added in frozen hash browns and diced yellow onions while grinding the meat prior to stuffing it into casings. Hi Mountain is a local company that has a variety of products to process your own game.

Venison Potato Brat Omelet

Serves 2

2 Venison brats

1 T. olive oil

1/4 c. diced yellow onion

2 diced green onions (I had just harvested them from the garden and needed to use them)

3 eggs

1 T. milk

2 oz. pepperjack cheese, slices torn up or shredded

1/2 c shredded cheddar cheese

1/2 c water

salsa, optional

~~~~~~~~~~~~~~~~~~~~~~~~~~~~~~~~~~~~~~~~~~~~~~~~~~~~~~~~~~~~~~

1. Dice onions and sautee in 1 T. olive oil. Slice up uncooked brats into round pieces and add to onions.  Add 1/2 c water to frying pan so that the brats don’t get scorched. Cook on medium heat covered with lid. Stir gently with a spatula every few minutes and add more water if necessary.

2. Meanwhile, scramble 3 eggs with 1 T. milk. Season with salt and pepper if desired.

3. The brats take about 10-15 minutes to cook through. Once they are done, turn down the heat to low and add in the egg mixture.

4. Cover with lid, cook on low for 1-2 minutes until eggs begin to set and turn off heat.  Once eggs begin to set, add cheeses and cover with lid to melt the cheese. DO NOT STIR. Make sure the heat is low enough here that the bottom does not burn.

5. Remove from heat and use a spatula to cut omelet into pieces. Serve with salsa if you like.